Evil Yumminess in the Land of Giant Cupcakes

November 19, 2010

Soccer Ball Cake

Filed under: Cake,cotton candy,sheet cake,soccer — by queenofevilyumminess @ 10:46 AM
Tags: , ,

When asked to make a cake with a soccer ball on it, my first thought was along the lines of, “Urrrgggg!” However, I quickly remember that Wilton makes a 3D soccer ball pan that has the lines indented on the pan so that I wouldn’t have to figure out how to decorate it on my own. I might have had to decline the cake had I had to do it myself. It worked out. I got to buy a new pan, much to my husband’s continuing dismay.

I did a quick search online for some ideas and found one I really liked on CakeCentral.com. Since I didn’t have a 12×12 pan (DANG!), I decided to just use a 9×13 pan. Also, I did it in buttercream because I don’t do fondant, at least not yet anyway.

I did the main cake in three layers (long story short…the cake didn’t rise like it should and I don’t know why. This seems to be a trend recently. Need to figure it out!). Two layers were strawberry and one was blue raspberry. The soccer ball was blue raspberry as well. The icing was cotton candy, with the exception of the white icing. I can’t make cotton candy icing that is white.

I had a horrible time trying to fill and ice this dang cake. I ended up having to dirty ice the cake, which I almost never have to do, which means that I used a TON of icing. Eventually, I got all the icing on the cake and got it smoothed out. Next, I plopped the soccer ball onto the cake and had at it. Luckily, I had the foresight to reserve some of the icing from the last batch so that I could have white icing without having to make more. Also luckily, you can tint green icing black very easily. I had been most worried about how the soccer ball would turn out, but did not end up having any issues which was nice. The grass around the ball gave me some problems. I don’t think I know how to properly use that particular tip the “grass” kept staying on the tip instead of the cake. Deep breath…removed stupid non-sticking grass…try again…

Then came the lettering. I hate writing on cakes. I suck at it and really, really need more practice. And I couldn’t find the correct size round tip. I also discovered that I am much better at doing lover case lettering than I am at upper case lettering.


Overall, I was really happy about the way the cake looked. There are always some little things that I wish I had done better, but I usually just don’t have the time available to produce a more perfect cake. For instance, you’ll notice that the corners have black icing on them. That is because I seem to be incapable to icing a cake with crisp, even corners, so I just cover them up by piping icing there. Easy fix that looks nice, but it still drives me nuts that I can’t get that figured out!


November 1, 2010

Pumpkin Baby Shower Cake

Filed under: Cake,Cupcake,Halloween,spice cake,Uncategorized — by queenofevilyumminess @ 11:42 AM
Tags: , , , , , ,

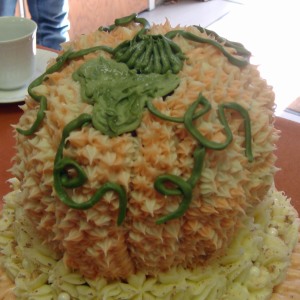
Thank goodness this thing is done and eaten now! I always get so excited when I am asked to make a larger cake and want to make the most of the opportunity. This instance was no different. I was pretty much told I could do the cake however I wanted as long as it came out elegant and pretty. My friend was very happy with the end result, Yay!!!

The cake was a spice cake, thus all my overly obsessed blog posts regarding generating a good spice cake, with cream cheese frosting. The thing weighed about ten pounds, I swear! The bottom cake was a four-layer 9″ cake decorated like a basket. I added a candy pearl accent around the bottom and a peachy-pink ruffle around the top. On top of that there was a two-layer 6″ round and then the 3D pumpkin. I added mini cupcakes around the bottom for extra flare. I had originally intended to put the mini cupcakes on top of the bottom cake so that it looked like a basket of flower, but there didn’t end up being enough room on top of the cake to do so. I guess I should have measured or something to make sure that they would have fit. It worked out, though. I also used a ton of luster dust to give the cake some shimmer and shine.

Since I needed to fill in the empty space below the pumpkin, I whipped out a big flower-ish tip and plopped a bunch of flowers into that space. I didn’t like the effect really, but decided that if I added the luster dust it would be okay. I added some of the candy pearls, too, and it turned out looking nice.

I put both peach and white icing in a pastry bag and covered the 3D pumpkin with tip #18 drop stars. I started in the indented parts and worked my way out so that the shape would still show. The green on the top for the leaf, stem and vines got a treatment of luster dust, too, so that they would stand out some more. The pumpkin looked really, really sad without the green and pretty dang good with it.

I started icing this thing at around 7:30 pm Friday night. I took a short break (about 30 minutes) to get my daughter into bed and then dove right back into the cake. I finally finished the decorating, not including the mini cupcakes which I did the next day, at around midnight. I don’t plan to ever pipe cream cheese frosting again if I can help it. It is either too stiff or too soft. There is too small a window when the icing is just right to work with and I’m too impatient.

As I mentioned before, I think the cake weighed about ten pounds. Between the cake itself, the mini cupcakes, and the whoopie pies that I filled, there was 4 packages of cream cheese, 4 sticks of butter, and 4 pounds of powdered sugar. Plus, add in the weight from the different elements of cake and we are talking one dang heavy cake. I was so afraid I was going to drop it!

On another note, I really need to make a sign to put in the back of my car so that the poor souls that get stuck behind me when I’m delivering a cake know why I’m only driving about 4 miles per hour. I’m thinking something like, “Cake Delivery in Progress…SORRY!”

October 29, 2010

Oh Dang…There Went the Flour!

Filed under: Uncategorized — by queenofevilyumminess @ 10:49 AM

My official story is that I was trying to decorate the house for Halloween…yep, that’s what happened. For sure. Did it on purpose.

I thought I would lead with the picture in this post. This is what happens when you are tired and clumsy. I had just filled the container with a bag of flour and was putting it away in the cabinet. It just never quite got to its destination. Instead, it tipped and fell on my head. The lid came off and the flour detonated…POOF!!! I stood stunned for a moment before the expletives began flowing freely from my mouth. You’ll notice that we have carpet in our kitchen, too, which made the whole mess that much worse. No easy clean up here. I had to vacuum for about an hour before that section of carpet resembled its usual color.

I should have known something bad was going to happen since I had just messed up batch of Pumpkin Creme Pies. As I was mixing the wet ingredients, I realized that I had added a stick of butter that didn’t need to be there. Force of habit is a very strong thing! I have already added the $2.00 can of pumpkin so I managed to fix my mistake. I added 1 1/2 cup flour, some extra spices, and an extra egg. Turned out good. There was no noticeable difference in the cakes and it made a zillion of them, which was nice since I was taking them to work the next day.  Anyway, having just had the butter issue I was not terrible surprised when the “flour incident” happened.

My vacuum hates me. My husband was surprisingly quiet on the matter. He must have figured that I’d already experienced enough for the day and took pity on me. I was really disappointed that the battery on my camera was totally dead. I was going to take a bunch of pictures, but since the battery was dead I had to use the camera on my cell phone (which sucks, by the way).

October 28, 2010

Successful Candy Corn Peanut Butter Cookies

Finally, I have this silly cookie figured out! My wonderful co-worker, Tanya the Enabler, suggested that I try using the candy corn flavored Hershey’s Kisses. THANK YOU, TANYA!!! Not only do these taste really yummy, they are also melt-able! Regular candy corn does not handle being baked into things or being melted and cooled. It gets hard and nasty. The kisses, however, are perfect. There’s a recipe on the back of the candy bag suggests melting some and drizzling them over cookies. After reading this, I had to take a minute to calm myself down due to the possibilities that were running through my head!

Anyway, dorkiness aside, I was very please to find that I finally had a finished product that matched my initial idea.

I chopped up a package of Kisses (minus 18) and added them instead of the Heath bits that the recipe usually calls for. For whatever reason, perhaps over mixing, the cookies turned out a little flatter than I would have liked. Seems to be the trend for this week. Grrr. I would have also liked to had some of that chunky pretzel salt to add to the top of the cookie. Other than that…PERFECTION!!! You bite into the cookie and it you instantly get the candy corn taste. The candy corn flavor had gotten lost in other trial batches.

Here’s the recipe:

Ingredients

  • 1/2 cup butter
  • 3/4 cup Skippy Natural Super Chunk Peanut Butter
  • 1-1/4 cups packed light brown sugar
  • 3 tablespoons milk
  • 1-1/2 tablespoon vanilla extract
  • 1 egg
  • 1-1/2 cups all-purpose flour
  • 3/4 teaspoon baking soda
  • 3/4 teaspoon salt
  • 1 cup salted peanuts (optional)
  • 1 bag candy corn flavored Hershey’s Kisses,  coarsely chopped

Directions

1. Heat oven to 375°F.

2. Beat butter, peanut butter, brown sugar, milk and vanilla in large bowl until well blended. Add egg; beat just until blended. Combine flour, baking soda and salt; gradually beat into peanut butter mixture. Stir in 1 cup nuts and candy corn pieces

3. Drop by heaping teaspoons about 2 inches apart onto ungreased cookie sheet lined with parchment paper.

4. Bake 8-10 minutes or until set. Do not over bake (see note #1 at bottom). Cool 2 minutes. Remove to wire rack. Cool completely. About 3 dozen cookies.

5. If desired, melt some candy corn Kisses and drizzle over the top of the cookies.

NOTE #1: The original recipe recommends a cooking time of 7-8 minutes. I have have to bake my cookies, even the smaller ones, for 10-11 minutes. I recommend starting to check your first sheet of cookies at around 7 minutes. The cookies are done when the edges begin to brown ever so slightly. You will need to leave the cookies on the sheet for a few minutes since they are very soft. If you try to move them immediately, you’ll most likely end up with a huge mess.

October 27, 2010

Mmm…(Translation: Whoopie Pies)

Yes, it’s true…”Mmm” now means Whoopie Pie. Growing up near an Amish community meant that there were almost always Whoopie Pies close at hand. They are soft, sticky, yummy cake sandwiches. If you’ve never had one, you don’t know what you are missing. Traditionally, Whoopie Pies consist of  marshmallow fluff sandwiched between domed circles of chocolate cake. Recently, I saw a post that Pioneer Woman had made on Facebook regarding some spectacular-looking Pumpkin Creme Pies. Normally, I’m not much of a pumpkin person, however, these looked fabulous and I HAD to try them.

I went to the store, bought the ingredients, waited for my husband to go to work (key step in the process), and got busy. The recipe was easy to follow, but requires that you pipe the batter in concentric circles onto parchment paper. No problem for me, but if you’ve never wielded a pastry bag before it might be a bit of a challenge. The end result was tastier than I could have ever hoped. I was hooked and so was everyone else that came into contact with them.

Once again, I didn’t take pictures of the process, but I didn’t figure it was really needed since the original information was pretty dang complete. I ended up with WAY more finished product than the recipe said it should make, but that’s a good thing, right!

I periodically window shop at Amazon.com for new and interesting cookbooks. Not too long ago, I had come across a book dedicated to the Whoopie Pie. The day after I made the pumpkin creme pies, I bought the book. The next day it arrive and that same day I was baking from it. The book is called “Whoopie Pies: Dozens of Mix ’em, Match ’em and Eat ’em Up Recipes.” So far, I’m in love with this book. It has a ton of recipes for both the pies and for the fillings, as well as lots of pictures.

I really wanted to make the s’mores version of the whoopie, but didn’t have ANY of the ingredients. So I opted for the oatmeal one. I’ve been searching for an oatmeal cookie recipe that yields are really soft, thick cookie. Since the cake part of a whoopie pie is usually very moist and soft, I figured that the oatmeal recipe in the book would get me what I wanted. It did, almost. The cookie was very, very soft and yummy, but it was pretty dang thin. After doing some research, I think it would have been thicker if I had chilled the dough for a little while before baking it. We’ll see. I definitely plan on making them again. I opted for a maple buttercream filling since I had recently purchased a small bottle of pure maple syrup at the Covered Bridge Festival. I also added some vanilla bean paste, about 1 teaspoon worth.

This time, I ended up with fewer of the finished product than the recipe indicated that it would produce. The book said it should make about 48 2-inch cakes, meaning 24 completed whoopie pies. I ended up with 16 completed pies. I used a 1 tablespoon scoop to keep the size uniform. One tablespoon was the amount suggested in the book to get the 48 cakes; however, it just didn’t work out that way. It worked out in the end, though, since the recipe for the maple buttercream out of the book only made just enough to fill the number cookies that I had made.

Once again, Mmm…

Next Page »

Blog at WordPress.com.